Installing a torrent setup
Applications used
Transmission
 Transmission is a torrent download client.
Jackett
 Jackett works as a proxy server: it translates queries from apps (Sonarr, Radarr, SickRage, CouchPotato, Mylar, DuckieTV, qBittorrent, etc) into tracker-site-specific http queries, parses the html response, then sends results back to the requesting software. This allows for getting recent uploads (like RSS) and performing searches. Jackett is a single repository of maintained indexer scraping & translation logic - removing the burden from other apps.
Sonarr
 Sonarr is a personal video recoreder for Usenet and BitTorrent users. It can monitor multiple RSS feeds for new episodes of your favorite shows and will grab, sort and rename them. It can also be configured to automatically upgrade the quality of files already downloaded when a better quality format becomes available.
Radarr
 Radarr is an independent fork of Sonarr reworked for automatically downloading movies via Usenet and BitTorrent.
Lidarr
 Lidarr is a music collection manager for Usenet and BitTorrent users. It can monitor multiple RSS feeds for new tracks from your favorite artists and will grab, sort and rename them. It can also be configured to automatically upgrade the quality of files already downloaded when a better quality format becomes available.
Summary
Transmission setup
Organizing mounts
Transmission will need three main folders :
config: to store Transmission’s configurationdownloads: to store downloadswatch: where the torrents will be put. Transmission will watch for new torrent file addition and start downloading when one is added. This is called a torrent blackhole inJackett.
Mapping
| Local | Container |
|---|---|
| ./transmission_config | /config |
| ../NAS/Downloads/ | /downloads |
| ./transmission_watch | /watch |
Setting up the IP address
I chose to reserve the IP address 10.0.7.0 for Transmission.
To do so, I went into my router DHCP dashboard and set a static DHCP address.
The rule maps the MAC address 02:42:0A:00:07:00 to the IP address 10.0.7.0
and also sets the hostname to TRANSMISSION.
Jackett setup
Organizing mounts
Jackett will need two main folders :
config: to store its configurationdownloads: path to the torrent blackhole
Mapping
| Local | Container |
|---|---|
| ./jackett_config | /config |
| ../NAS/Downloads | /downloads |
| /etc/localtime | /etc/localtime:ro |
Setting up the IP address
I chose to reserve the IP address 10.0.7.1 for Jackett.
To do so, I went into my router DHCP dashboard and set a static DHCP address.
The rule maps the MAC address 02:42:0A:00:07:01 to the IP address 10.0.7.1
and also sets the hostname to Jackett.
Radarr setup
Organizing mounts
Radarr will need three main folders :
config: to store Radarr’s configurationdownloads: to store downloadsmovies: where the movies will be moved when downloaded. Also the directory where you currently store your already existing movies.
Mapping
| Local | Container |
|---|---|
| ./radarr_config | /config |
| ../NAS/Downloads/ | /downloads |
| ../NAS/Multimedia/Videos/Movies | /movies |
Setting up the IP address
I chose to reserve the IP address 10.0.7.5 for Radarr.
To do so, I went into my router DHCP dashboard and set a static DHCP address.
The rule maps the MAC address 02:42:0A:00:07:05 to the IP address 10.0.7.5
and also sets the hostname to Radarr.
Sonarr setup
Organizing mounts
Radarr will need three main folders :
config: to store Radarr’s configurationdownloads: to store downloadstv: where the tv shows will be moved when downloaded. Also the directory where you currently store your already existing tv shows.
Mapping
| Local | Container |
|---|---|
| ./radarr_config | /config |
| ../NAS/Downloads/ | /downloads |
| ../NAS/Multimedia/Videos/TV.Shows | /tv |
Setting up the IP address
I chose to reserve the IP address 10.0.7.6 for Sonarr.
To do so, I went into my router DHCP dashboard and set a static DHCP address.
The rule maps the MAC address 02:42:0A:00:07:06 to the IP address 10.0.7.6
and also sets the hostname to Sonarr.
Lidarr setup
Organizing mounts
Radarr will need three main folders :
config: to store Radarr’s configurationdownloads: to store downloadsmusic: where the music will be moved when downloaded. Also the directory where you currently store your already existing music.
Mapping
| Local | Container |
|---|---|
| ./radarr_config | /config |
| ../NAS/Downloads/ | /downloads |
| ../NAS/Multimedia/Audio/Music | /music |
Setting up the IP address
I chose to reserve the IP address 10.0.7.7 for Lidarr.
To do so, I went into my router DHCP dashboard and set a static DHCP address.
The rule maps the MAC address 02:42:0A:00:07:07 to the IP address 10.0.7.7
and also sets the hostname to Lidarr.
 Docker-compose
Here is the content of the docker-compose file
version: "2.2"
services:
  lidarr:
    container_name: "lidarr"
    image: "linuxserver/lidarr:latest"
    hostname: "lidarr"
    restart: "unless-stopped"
    environment:
      - TZ="Europe/Paris"
      - PGID=1004
      - PUID=1000
    networks:
      host-macvlan-net:
        ipv4_address: 10.0.7.7
    ports:
      - "8686:8686"
    volumes:
      - "./lidarr_config:/config"
      - "../NAS/Downloads/:/downloads"
      - "../NAS/Multimedia/Audio/Music:/music"
      - "/etc/localtime:/etc/localtime:ro"
    depends_on:
      - transmission
      - jackett
  sonarr:
   container_name: "sonarr"
   image: "linuxserver/sonarr:90"
   hostname: "sonarr"
   restart: "no"
   environment:
     - TZ="Europe/Paris"
     - PGID=1004
     - PUID=1000
   networks:
     host-macvlan-net:
       ipv4_address: 10.0.7.5
   ports:
     - "8989:8989"
   volumes:
     - "./sonarr_config:/config"
     - "../NAS/Downloads/:/downloads"
     - "../NAS/Multimedia/Videos/TV.Shows:/tv"
     - "/etc/localtime:/etc/localtime:ro"
   depends_on:
     - transmission
     - jackett
  radarr:
    container_name: "radarr"
    image: "linuxserver/radarr:latest"
    hostname: "radarr"
    restart: "unless-stopped"
    environment:
      - TZ="Europe/Paris"
      - PGID=1004
      - PUID=1000
    networks:
      host-macvlan-net:
        ipv4_address: 10.0.7.6
    volumes:
      - "./radarr_config:/config"
      - "../NAS/Downloads/:/downloads"
      - "../NAS/Multimedia/Videos/Movies:/movies"
      - "/etc/localtime:/etc/localtime:ro"
    depends_on:
      - transmission
      - jackett
  transmission:
    container_name: "transmission"
    image: "linuxserver/transmission"
    hostname: "transmission"
    restart: "unless-stopped"
    environment:
      - TZ="Europe/Paris"
      - PGID=1004
      - PUID=1000
    networks:
      host-macvlan-net:
        ipv4_address: 10.0.7.0
    volumes:
      - "./transmission_config:/config"
      - "../NAS/Downloads/:/downloads"
      - "./transmission_watch:/watch"
  jackett:
    image: "linuxserver/jackett"
    container_name: "jackett"
    hostname: "jackett"
    environment:
      - PUID=1000
      - PGID=1004
      - TZ="Europe/Paris"
    volumes:
      - "./jackett_config:/config"
      - "../NAS/Downloads:/downloads"
      - "/etc/localtime:/etc/localtime:ro"
    networks:
      host-macvlan-net:
        ipv4_address: 10.0.7.1
networks:
  host-macvlan-net:
    external:
      name: host-macvlan-net
Now that the docker-compose file is complete, start up the containers with
docker-compose up -d. This will create the containers and populate the
configuration files.
Transmission configuration
Navigate to http://transmission:9091 to make sure that transmission is up and running.
You should get the following error the first time your access it through this URL.
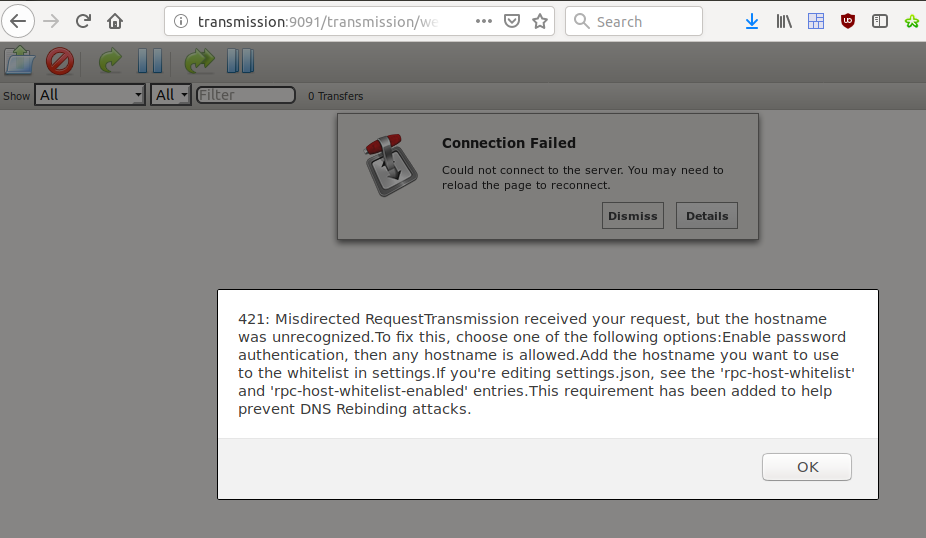
This is a security feature that verifies from which address transmission was
accessed. To allow access from http://transmission, we have to edit the file
~/Torrent/transmission_config/settings.json.
But first we have to stop the container with docker-compose stop.
Then, in ~/Torrent/transmission_config/settings.json, we can replace the line :
"rpc-host-whitelist": "",
by
"rpc-host-whitelist": "transmission, transmission.home",
We also need to ensure that rpc-host-whitelist-enabled is set to true.
"rpc-host-whitelist-enabled": true,
I would love to change the port to 80. This is a personal preference
that allows me to access the service with the address http://transmission.
However I can’t (see this thread).
Once this is done, we can restart the containers with docker-compose up -d
and try to access to the service through http://transmission.
Jackett configuration
We access the Jackett configuration interface through http://jackett.home:9117.
We can add indexers with + Add indexer, we just need to click the + button
to add an indexer.
The configuration is as simple as this, so start adding your indexers !
Radarr configuration
Now comes the complicated part. We access Radarr through http://radarr.home:7878/.
Radarr configuration is composed of the following parts
- Adding a download client
- Adding indexers
- Adding lists
- Configuring profiles
- Configuring media management
- Connecting to Kodi
- Adding your existing movies
Adding a download client
The download client will manage download from torrents or Usenet for Radarr. Here we only configure a torrent client (Transmission).
Go to Settings > Download Client and click on the big + button to start
configuring your first download client.
| Configuration | Value |
|---|---|
| Name | Transmission |
| Enable | yes |
| Host | transmission |
| Port | 9091 |
| Category | movies |
Click on Test to ensure that everything is set up properly and then Save.
This download client will be used to download Torrents.
Adding indexers
The indexers gives Radarr the ability to search for torrent which will be passed to the download client. Here we use Jackett to format popular sites such as KickassTorrent so that Radarr knows how to search them.
Open http://jackett.home:9117 on another window so that you can configure easily your indexers.
Go to Settings > Indexers and click on the big + button to start
configuring your first indexer.
| Configuration | Value |
|---|---|
| Name | Whatever, this is just so that you can recognize it easily |
| Enable RSS Sync | Yes |
| Enable Search | Yes |
| URL | In Jackett, click Copy Torznab feed and paste it here |
| API Key | In Jackett copy the API Key and paste it here |
Don’t forget to test the indexer before adding it.
For anime indexers, you will have to enable the hidden options and add the
category 5070 in the hidden categories field.
You can add all the indexers you added in Jackett.
Configuring lists
Lists gives Radarr the ability to know which films are about to be released, which ones are already released, the IMDB score, and other information. This is basically the discovery feature of Radarr.
Radarr comes with predefined lists.
In Settings > Lists click the big + button to add your first list.
Choose Presets under Radarr Lists to add a predefined list.
Here are some recommended values for the configuration
| Configuration | Value |
|---|---|
| Minimum availability | Announced |
| Quality Profile | HD-1080p |
| Folder | /movies/ |
| Enable Automatic Sync | Yes |
Configuring profiles
Profiles lets Radarr know how you would like your movie to be downloaded in terms of quality and language.
In Settings > Profiles a number of profiles already exist.
Radarr will keep searching for better qualities for already downloading films
until the quality configured in the Cutoff option is found.
When you will add Lists or Movies you will have the opportunity to select
a profile.
For instance, you might want to create a Japanese Anime profile so that
animes are downloaded in Japanese and at least in 720p.
Configuring media management
In Settings > Media management you can decide how your movies will be named.
My personal configuration is :
| Configuration | Value |
|---|---|
| Rename movies | Yes |
| Replace illegal characters | Yes |
| Colon replacement format | Delete |
| Standard Movie Format | {Movie.Title}.{Release.Year}.{Quality.Title} |
| Movie folder format | {Movie.Title}.({Release Year}) |
| Create empty movie folders | Yes |
Connecting to Kodi
If you use Kodi, you can connect Radarr to one or multiple instances so that :
- Kodi receives notification when a movie is grabbed or downloaded
- Kodi updates its library when a movie is downloaded
Coupled with Kodi “Recently imported” view, you can now only rely on Kodi to know what’s new in your library.
To add a Kodi instance go to Settings > Connect. Click on the + button and
choose Kodi.
| Configuration | Value |
|---|---|
| Name | Kodi |
| On Grab | Yes |
| On Download | Yes |
| Host | kodi hostname |
| Port | kodi port |
| Username | kodi username |
| Password | kodi password |
Test and save.
Adding your existing movies
In Add movies select Bulk Import Movies.
Choose the path /movies where you should have mapped your NAS directory from
the docker-compose file.
Click on the green tick and save. Now Radarr will scan this folder to find your existing movies and add them to your library.
Sonarr configuration
The configuration for Sonarr is basically the same as for Radarr.
Lidarr configuration
The configuration for Lidarr is basically the same as for Radarr.
Backup script
#!/bin/zsh
#
#This script backs up the jdownloader2 config
#It must be executed by the root user to work properly
#
TORRENT_DIR=/home/sammy/Torrent
declare -a CONFIGS=("jackett" "transmission" "lidarr" "sonarr" "radarr")
SHARED_BACKUP_DIR=/home/sammy/backup/Torrent
NEW_BACKUP_NAME=$(echo -n "$(date +%s)_$(date -I | tr - _)")
NEW_BACKUP_DIR="$SHARED_BACKUP_DIR/$NEW_BACKUP_NAME"


# Create a new directory on the shared folder
echo "Creating new directory $NEW_BACKUP_DIR"
mkdir -p $NEW_BACKUP_DIR
# Backup the config dir
for conf in "${CONFIGS[@]}"
do
    echo "Backing up $conf  config..."
    cp -r "$TORRENT_DIR/$conf""_config" $NEW_BACKUP_DIR
done

# Create tar from backed up directories
echo "Creating tar file"
tar -cvzf "$NEW_BACKUP_DIR.tar" -C "$NEW_BACKUP_DIR" .

rm -r "$NEW_BACKUP_DIR"

echo "Torrent backup finished"
Advanced transmission container
When running a torrent client, you will probably want to be doing it behind a VPN. You can do it directly on your router but what if you change it one day and forget that you had transmission running ?
Another option is to run it directly in the transmission docker container. A developer named Haugene has made a container that does just that.
In my setup I do both options, you’re never too safe !
Transmission with integrated VPN
Below is the docker-compose configuration that we will use for this container :
  transmission:
    container_name: "transmission"
    image: "haugene/transmission-openvpn"
    hostname: "transmission"
    restart: "unless-stopped"
    cap_add:
      - NET_ADMIN
    environment:
      - TZ="Europe/Paris"
      - PGID=1004
      - PUID=1000
      - CREATE_TUN_DEVICE=true
      - OPENVPN_PROVIDER=PROTONVPN
      - OPENVPN_CONFIG=CA\ Toronto
      - OPENVPN_USERNAME=user
      - OPENVPN_PASSWORD=pass
      - WEBPROXY_ENABLED=false
      - LOCAL_NETWORK=10.0.0.0/24
      - HEALTH_CHECK_HOST=our_site.com
      - TRANSMISSION_SPEED_LIMIT_UP=0
      - TRANSMISSION_SPEED_LIMIT_UP_ENABLED=true
    networks:
      host-macvlan-net:
        ipv4_address: 10.0.7.0
    volumes:
      - "./transmission_config:/config"
      - "../NAS/Downloads/:/downloads"
      - "./transmission_watch:/watch"
      - "./protonvpn:/etc/openvpn/protonvpn"
Let’s take a look at the options available here :
PGIDandPUIDset the user id and group id for the transmission user. We set it to our server user so that the files can be read by radarr and sonarr…CREATE_TUN_DEVICEcreates /dev/net/tun device inside the container, mitigates the need mount the device from the hostLOCAL_NETWORKlets us access to transmission from our local networkHEALTH_CHECK_HOSTis the host pinged to check if the network connection still worksTRANSMISSION_SPEED_LIMIT_UPandTRANSMISSION_SPEED_LIMIT_UP_ENABLEDlets us override transmission optionsOPENVPN_PROVIDERdefines the openvpn provider from the preconfigured listOPENVPN_CONFIGdefines the .ovpn file to use according to the OpenVPN Provider chosenOPENVPN_USERNAMEandOPENVPN_PASSWORDare your VPN credentials
We also have a new volume mounted : ./protonvpn.
This folder will contain all of our VPN server configurations.
Since the docker container might not contain all of our configurations we mount this volume.
The configurations needs to be slightly modified to work with our containers.
To apply to proper modifications we just have to run the script adjustConfigurations.sh <path_to_folder_with_configuration> on our folder.
It will add some additional configuration to our files.
Once we have updated our docker-compose file we can check the IP address of our container with :
docker exec -it transmission curl ifconfig.io
Router kill switch
Now that our container has a VPN configured, we will add an extra layer of security on our router.
The objective is to prevent the container from communicating with the outside world if the VPN is not working.
In order to do that, we will restrict the addresses the container can communicate to.
In my setup I use a router with Tomato Advanced installed. In the menu Administration > Scripts > Firewall I am able to add iptables rules.
I add the following rules :
# First we forbid all communication from / to the container
iptables -I FORWARD -s 10.0.7.0 -j DROP
iptables -I FORWARD -d 10.0.7.0 -j DROP
# Then we allow selectively each of the VPN configured
# in the list OPENVPN_CONFIG
iptables -I FORWARD -s 185.100.2.2 -d 10.0.7.0 -j ACCEPT
iptables -I FORWARD -s 10.0.7.0 -d 185.100.2.2 -j ACCEPT
# First VPN backup server
iptables -I FORWARD -s 194.2.100.19 -d 10.0.7.0 -j ACCEPT
iptables -I FORWARD -s 10.0.7.0 -d 194.2.100.19 -j ACCEPT
# Second VPN backup server
iptables -I FORWARD -s 194.100.2.21 -d 10.0.7.0 -j ACCEPT
iptables -I FORWARD -s 10.0.7.0 -d 194.100.2.21 -j ACCEPT
# Finally we allow the container to communicate inside the
# local network
iptables -I FORWARD -s 10.0.0.0/20 -d 10.0.7.0 -j ACCEPT
iptables -I FORWARD -s 10.0.7.0 -d 10.0.0.0/20 -j ACCEPT
To get the IP addresses of our VPN server we look in the given .ovpn files :
cat protonvpn/pt-01.protonvpn.com.udp.ovpn | grep remote
185.100.2.2
Once we have added our rules to our iptable we reboot the router.